“Why isn’t ZoomIt available on Mac?”
Now it is.

🎯 What This Article Covers
- Why Windows’ legendary presentation tool ZoomIt came to macOS
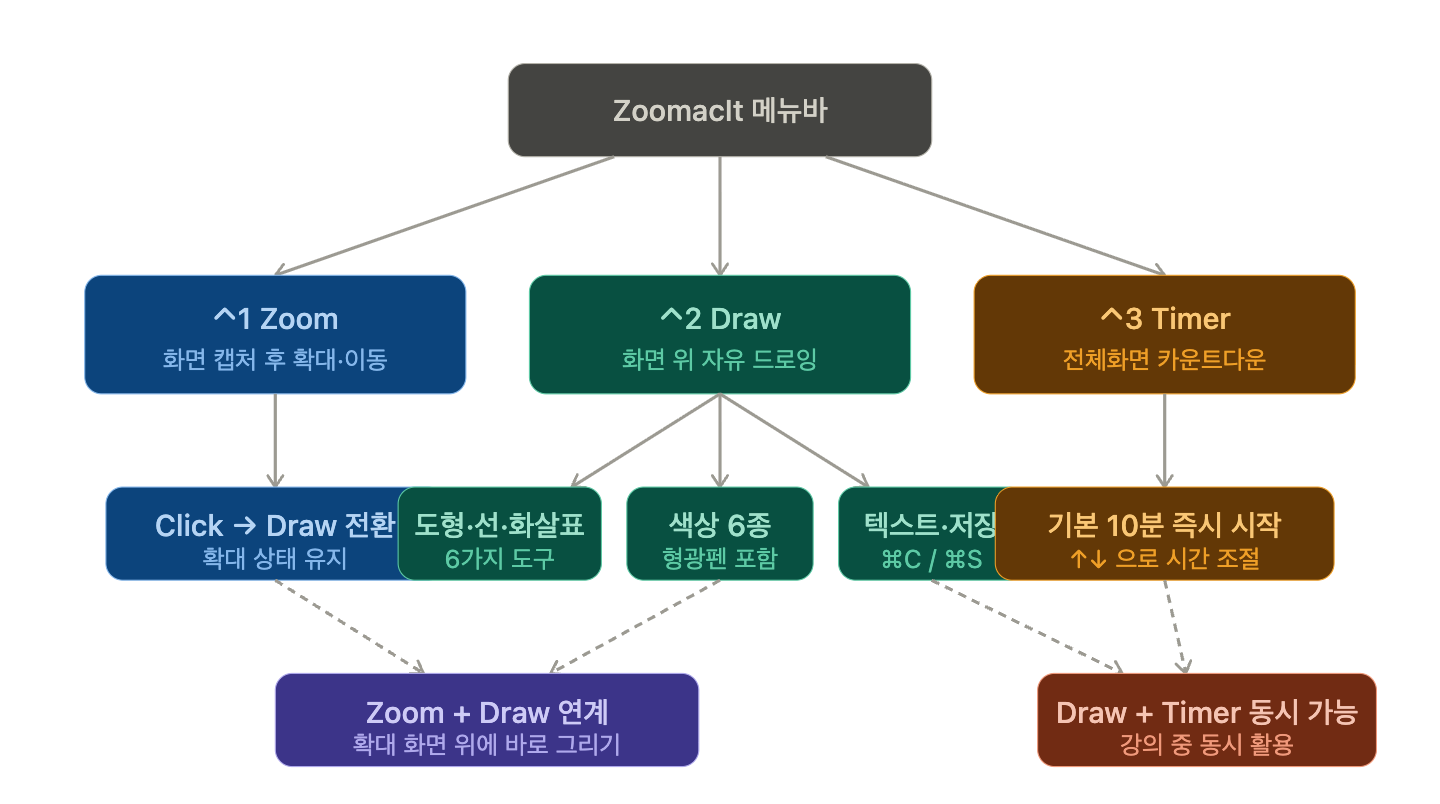
- ZoomacIt’s 3 core features — Zoom, Draw, Break Timer
- Step-by-step guide from installation to practical lecture use
- A complete summary of keyboard shortcuts IT instructors/presenters must know
- Tips on how to effectively use it in real lecture settings
📌 Introduction / Background
When giving IT lectures or technical presentations, there are moments like these:
When the code displayed on the screen isn’t visible to students in the back, when you want to circle a specific part of a diagram and say “This part right here!“, or when you want to display a timer for a break on the screen.
For Windows users, there’s no one who doesn’t know ZoomIt. This tool, created by Microsoft Sysinternals, provides screen magnification, drawing, and timer functions with a single shortcut, making it an essential tool for countless instructors and presenters.
However, there was a problem. There was no official ZoomIt for macOS.
Mac users who lectured either used expensive paid apps, put up with inconvenience, or simply gave up. To solve this inconvenience, the open-source project ZoomacIt emerged. The name is clever, isn’t it? Zoom + Mac + It.
🔍 What is ZoomacIt?

ZoomacIt is a native macOS menubar app. Developed in Swift, it aims to implement ZoomIt’s core features in the macOS environment. It’s open-source (GPL-3.0) on GitHub, and currently, v0.4.0 has been released.
Currently Supported Features
| Feature | Status |
| Screen Zoom (Still Zoom) | ✅ Supported |
| Live Zoom | 🔜 Not Supported |
| Screen Drawing (Draw) | ✅ Supported |
| Break Timer | ✅ Supported |
| Screen Snipping (Snip) | 🔜 Not Supported |
| Screen Recording (Record) | 🔜 Not Supported |
The three core features — Zoom, Draw, and Break Timer — are already stably supported. Since they include all the most frequently used functions in actual lectures, it is sufficiently practical.
💻 Installation Method
Installation is very simple. However, due to macOS security policies, one additional step is required.
Step 1. Download DMG
Download the latest .dmg file from the GitHub Releases page.
https://github.com/07JP27/ZoomacIt/releasesStep 2. Install the App
Open the .dmg file and drag ZoomacIt.app to the Applications folder. This is the same as installing a regular app.
Step 3. Disable Security Warning ⚠️
When you run it for the first time, you might see a warning like this:
“Apple could not verify “ZoomacIt” is free of malware that may harm your Mac…”
This is because macOS’s Gatekeeper blocks apps not distributed through the App Store. Run the following command in Terminal to remove the quarantine flag.
xattr -cr /Applications/ZoomacIt.app💡 Note: As an open-source project, you can directly check the source code on GitHub. It is recommended to review the code before running it.
Step 4. Grant Permissions
When you run the app, it will request Screen Recording permission. This permission is essential for capturing the screen to zoom and draw. Allow it in System Settings → Privacy & Security → Screen Recording.
Once installed, the ZoomacIt icon will appear in the top menubar. 🎉
🔍 Detailed Guide to Core Features
1️⃣ Zoom Mode — ⌃1 (Control+1)
This mode allows you to freely zoom, unzoom, and pan the screen after capturing it. It’s best for showing specific parts of code or diagrams enlarged during a lecture.
Main Operations:
| Input | Action |
| Mouse Movement | Screen Panning |
| Scroll / ↑↓ Keys | Zoom In / Zoom Out |
| Click | Enter Draw Mode (Draw on magnified screen) |
| Escape | Exit Zoom |
| Right Click | Exit Zoom |
💡 Usage Tip: The Zoom → Click → Draw flow is powerful. If you click while the screen is magnified, it immediately switches to Draw mode, allowing you to draw directly on the magnified screen. Pressing Escape once returns to Zoom mode, and pressing it again exits completely.
2️⃣ Draw Mode — ⌃2 (Control+2)
This mode allows you to freeze the screen and draw freely on it. This is the most frequently used feature during lectures.
Drawing Tools:
| Input | Shape |
| Drag | Freehand Curve |
| Shift + Drag | Straight Line |
| Control + Drag | Rectangle |
| Tab + Drag | Ellipse |
| Shift + Control + Drag | Arrow 🏹 |
Color Shortcuts:
| Key | Color |
| R | Red (Default) |
| G | Green |
| B | Blue |
| O | Orange |
| Y | Yellow |
| P | Pink |
| Shift + Color Key | Highlighter Mode ✨ |
Other Tools:
Key Action
| Key | Action |
| T | Text Input Mode |
| ⌃ + Scroll | Adjust Pen Thickness |
| E | Erase All |
| W | Whiteboard Background |
| K | Blackboard Background |
| ⌘Z | Undo |
| ⌘C | Copy to Clipboard |
| ⌘S | Save to File |
💡 Usage Tip: Pressing the W key changes the background to a whiteboard. This is very useful for explaining concepts by writing or drawing diagrams directly on the screen without a separate whiteboard app.
3️⃣ Break Timer — ⌃3 (Control+3)
A full-screen countdown timer used to announce break times. The default is 10 minutes, and it starts immediately when the shortcut is pressed.
Timer Operations:
| Input | Action |
| ↑ | Add 1 Minute |
| ↓ | Decrease 1 Minute |
| R/G/B/O/Y/P | Change Timer Color |
| Escape | Exit Timer |
💡 Unique Feature: The timer does not disappear from the screen when it reaches 0:00. Instead, it displays the elapsed time in the format 0:00 (1:15). This allows you to see at a glance how late students are. (Surprisingly practical feature 😄)
Also, Draw mode (⌃2) and Break Timer (⌃3) can be used simultaneously.
⚠️ Precautions / Common Mistakes
① Check Screen Recording Permission This is the most common issue. If permission is not granted, Zoom mode will not function correctly. Be sure to check that ZoomacIt is enabled in System Settings → Privacy & Security → Screen Recording.
② Gatekeeper Bypass Command is Only Needed Once The xattr -cr command only needs to be run once during the initial installation. It may also need to be run again if you replace it with a new version after an update.
③ Live Zoom is Not Yet Supported ZoomIt’s Live Zoom (real-time magnification) is not currently implemented. Magnification only works when the screen is frozen. A practical alternative during live coding demonstrations is to pre-enlarge the font size in your IDE.
④ Beware of Shortcut Conflicts ⌃1, ⌃2, and ⌃3 may conflict with some apps (especially terminal emulators). Test that the shortcuts work correctly before your lecture.
⑤ Understand Open-Source Project Characteristics It is currently under active development at v0.4.0. For production environments (e.g., important official presentations), it is recommended to test thoroughly beforehand.
✅ Summary / Conclusion
ZoomacIt is a highly recommended tool for anyone presenting or lecturing in a Mac environment.
- Free Open Source — No cost burden
- Native macOS App — Swift-based, light and fast
- Feature Compatibility with ZoomIt — Core 3 (Zoom, Draw, Timer) completed
- Simple Installation — Done with a single DMG
While Live Zoom, Snip, and Record features are not yet supported, it has all the functions immediately needed in a lecture setting. The project is also being continuously updated, so we expect more features to be added in the future.
Next Steps:
- Exploring the source code on GitHub and building it yourself can be a good learning experience
- You can also try contributing to open source through Issues and Pull Requests
- Comparing it with the original ZoomIt (Windows) to understand feature differences will help you choose appropriately for different situations
Be sure to try it in your next lecture. Your students’ reactions will change. 🎯
Leave a Reply