vi is an editor that modifies text files on a terminal screen. If you connect to a server and open a file, but characters aren’t being entered, or a key you pressed to exit ends up in the main text, you first need to distinguish between being in input mode or command mode.
There’s no need to memorize all commands from the start. Open a new practice file, enter text with ‘i’, finish input with ‘Esc’, then save and exit with ‘:wq’, and your first task is complete. This article expands on that 5-minute practice, covering movement, line editing, search, and replace.
Many environments where the ‘vi’ command is used actually run Vim (Vi IMproved). However, not all ‘vi’ implementations are Vim. The core commands below were selected based on the POSIX vi/ex specification, and execution was verified on Vim 9.1 on macOS. Screen display and some detailed operations may vary depending on the implementation or settings. POSIX vi Specification, Vim Official Getting Started

First 5 Minutes: Create, Save, and Reopen a File
This practice requires a shell with vi and mktemp installed. The temporary directory creation method below is commonly used on Linux and macOS, but mktemp itself is not considered a feature of POSIX vi. We will only use new text files instead of existing configuration or operational files.
The shell is the terminal state where you enter commands before running vi and after exiting it. First, execute the following two lines in the shell. If the first line fails, the second line will not be executed.
vi_lab_dir=$(mktemp -d)
vi "$vi_lab_dir/practice.txt"
vi_lab_dir is a shell variable that remembers the temporary directory for this practice. It will be used continuously in the same terminal. The ‘~’ below the blank screen is not a tilde character within the file, but indicates an area of the screen where there is no text yet.
1. Enter with ‘i’ and finish input with ‘Esc’
When vi is first opened, it is usually in command mode. Pressing the lowercase ‘i’ once here switches to insert mode. Type the following three lines directly, and press ‘Esc’ after the last ‘green’. Press ‘Enter’ between lines, but do not press an additional ‘Enter’ after the last line.
apple red
banana yellow
apple green
Here, ‘i’ and ‘Esc’ are keys you press, not characters you type into the file. In particular, sequences like Esc → :w → Enter in the descriptions below do not mean to type the arrows.
In insert mode, character keys are entered into the main text. In command mode, the same keys execute movement or editing commands. If you are confused about the mode, press ‘Esc’ to return to command mode before starting the next action. Messages like — INSERT — seen in Vim are not displayed identically in all vi implementations. Explanation of Insert and Command Modes
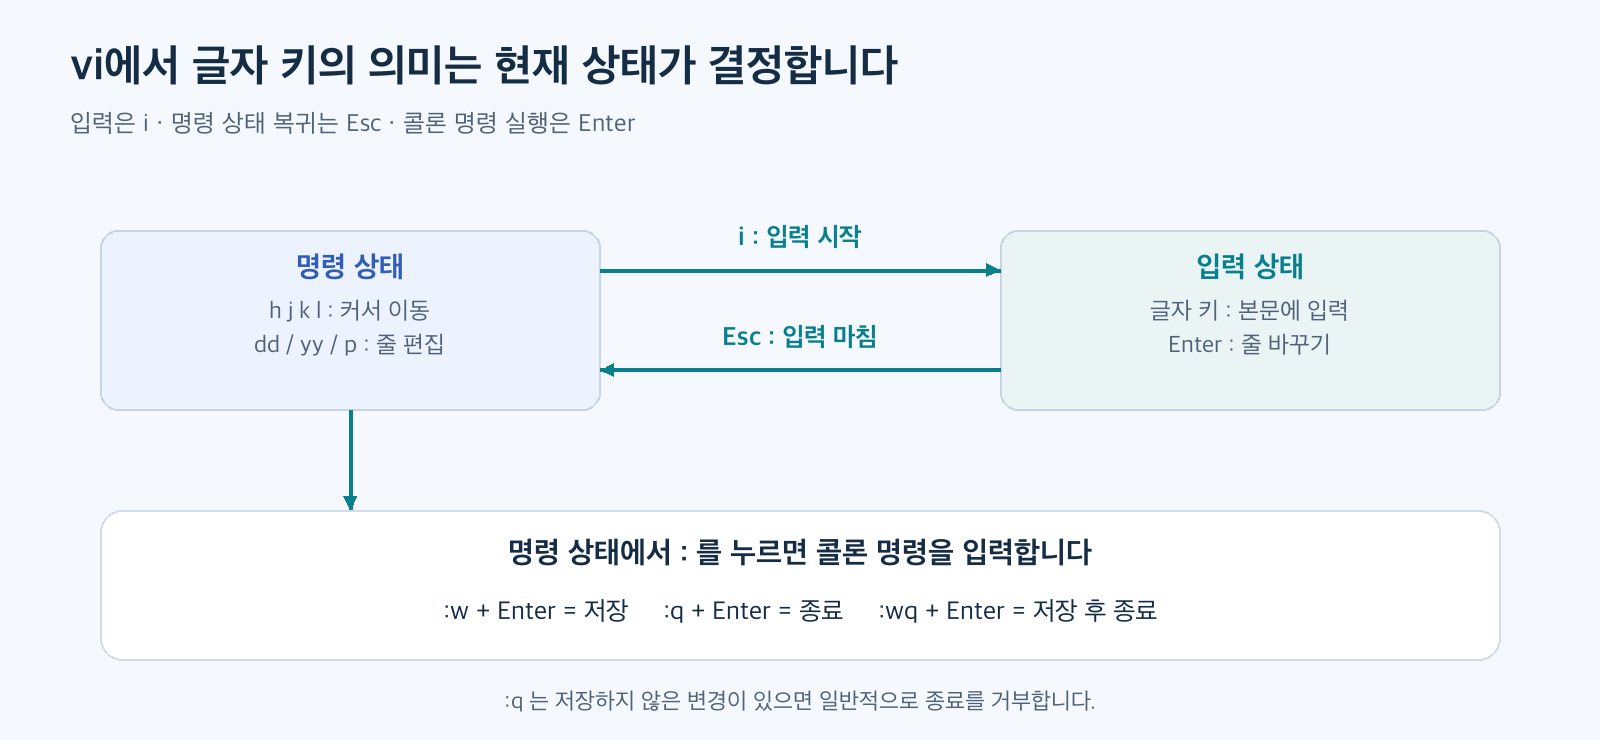
Figure: Reconstructed based on official documentation. Vim Insert Mode and Save and Exit.
2. Save with ‘:w’ and exit with ‘:q’
While holding ‘Esc’, type ‘:w’ and press ‘Enter’.
:wPressing the colon ‘:’ enters colon command input mode at the bottom of the screen, where you type commands. Here, you must press ‘Enter’ for the command to execute. ‘:w’ saves the current edits to the file and keeps the editor open. If a save error occurs, it is not considered saved.
If saving was successful, then press ‘:q’ and ‘Enter’.
:qOnce back in the shell, read the file. This is not a command to be entered within vi.
cat "$vi_lab_dir/practice.txt"If the three lines you initially entered are output as they are, you have confirmed input and saving. When editing a single file like in this practice, ‘:q’ is the exit command, and it generally refuses to exit if there are unsaved changes. Vim Save and Exit Explanation
3. Reopen, append a character, and exit with ‘:wq’
Reopen the same file from the shell.
vi "$vi_lab_dir/practice.txt"In command mode, press the following keys in order.
G → $ → a → ! → Esc → :wq → Enter‘G’ moves to the last line of the file, and ‘$’ moves to the last character of the current line. ‘a’ starts input after the current character, so ‘!’ is appended after ‘green’. After finishing input with ‘Esc’, execute ‘:wq’ to save and exit. When checking again with ‘cat’, the last line should be ‘apple green!’.
4. Try discarding unsaved changes with ‘:q!’
Reopen the file and press ‘G’. Then press lowercase ‘o’ to create a new line below the current line, type ‘temporary note’, and press ‘Esc’. Now, try executing ‘:q’. A message may appear refusing to exit due to unsaved changes.
If you decide to discard this additional line, press ‘Esc’ and then enter the following command and ‘Enter’.
:q!‘:q!’ is a command to exit without saving changes made since the last save. It is not a file deletion command. If you read with ‘cat’ in the shell, the three lines saved earlier and ‘green!’ remain, and only the unsaved ‘temporary note’ is gone. If you exit a new file that has never been saved with ‘:q!’, the new content might not be created as a file. Explanation of Exiting and Discarding Changes
Input Position and Movement: Go to the Right Place to Edit
Reopening the same file allows you to continue with the next practice. It’s easiest to start by placing the cursor at the beginning of a line and comparing the difference between ‘i’ and ‘a’.
Pressing ‘0’ moves to the first character of the current line. If you press ‘i’ here and type ‘Note: ‘ then ‘Esc’, the text ‘Note: ‘ will be inserted before the character where the cursor was, like ‘Note: apple red’. Conversely, if you go to the end of the line with ‘$’ and then type with ‘a’, it will be appended after the last character. ‘o’ creates a new line below the current line and immediately starts input.
Position movement and editing are done in command mode. ‘h’, ‘j’, ‘k’, ‘l’ are for left, down, up, and right, respectively. If you press ‘j’ in insert mode, the character ‘j’ might be entered instead of moving down, so press ‘Esc’ first.
‘w’ and ‘b’ are convenient for skipping multiple characters. ‘w’ moves to the beginning of the next word, and ‘b’ moves to the beginning of the previous word. If you press ‘b’ in the middle of a word, it first returns to the beginning of the current word. Word boundaries are affected not only by spaces but also by symbols, so initially practice with simple text like ‘apple red’.
You can move to the last line of the file with ‘G’, and to the first line with ‘1G’. ‘0’ is the number zero, and ‘o’ is the lowercase letter ‘o’. They are different commands. Vim Basic Movement
Line Deletion, Copy, Paste: What does ‘p’ put where?
If you don’t need to save the previous input experiments, exit with ‘:q!’ and reopen the same file. The following practice proceeds based on the three saved lines.
First, go to the first line with ‘1G’ and press ‘yy’. This action, pressing lowercase ‘y’ twice, copies the entire current line. Then, pressing lowercase ‘p’ results in the following:
apple red
apple red
banana yellow
apple green!
What was copied with ‘yy’ is line-unit text. Therefore, ‘p’ inserts it as a new line below the line where the cursor was. This is different from appending a string immediately after the current character. When pasting content copied character by character with ‘p’, it goes after the current character, but this ‘yy’ practice is line-unit. POSIX Line-Unit Paste, Vim Copy and Paste
The copied content goes into a register, which is a space within vi that remembers text. The ‘p’ in this practice, without any name specified, defaults to using the content of the unnamed register. It’s easy to get confused if you think of it as a command that automatically pastes content from the terminal or operating system clipboard.
Next, press ‘dd’ to delete the current line, and then immediately press ‘u’ once to undo that deletion. ‘dd’ also puts the deleted line into a register. Therefore, if you execute ‘dd’ after ‘yy’, the content for the next ‘p’ might change. Initially, practice with copy immediately followed by paste, and delete immediately followed by undo to easily verify the results.
It’s also possible to move a deleted line. From the original three lines, if you place the cursor on the first line and press ‘dd’, ‘banana yellow’ moves up to become the first line. In that state, if you press ‘p’, the deleted ‘apple red’ is inserted below the current ‘banana’ line where the cursor is. It is not pasted based on its position before deletion.
The undo history of ‘u’ varies by implementation. Here, we only learn the action of undoing the immediate previous change once. We do not assume that Vim’s multi-level undo or Ctrl-r redo are the same in all vi implementations. Differences in Undo between Vim and vi
Search and Replace: First Find, Then Narrow the Scope to Change
To search, type ‘/apple’ in command mode and press ‘Enter’.
/appleIt searches for matching locations after the current cursor position. Lowercase ‘n’ finds the next match in the same direction as the previous search, and uppercase ‘N’ finds it in the opposite direction. Whether the search wraps around from the end of the file to the beginning may vary depending on settings. After a ‘/’ search, ‘n’ usually searches forward, and ‘N’ searches backward. Vim Search Explanation
Replace not only finds text on the screen but also changes the actual edited content. The following examples replace ‘apple’ with ‘orange’ in the default settings. Each line is an independent example comparing scopes, and they are not meant to be executed consecutively from top to bottom.
WRIMO-MD-TABLE-0]% means the entire file line range, and ‘g’ at the end means all matches within that line. Just adding ‘g’ does not mean replacing the entire file. For example, if the current line is ‘apple apple’, the result of ‘:s/apple/orange/’ is ‘orange apple’, and the result of ‘:s/apple/orange/g’ is ‘orange orange’. Vim Replace and Scope
Initially, check the position with ‘/apple’ and try replacing only the current line. If the result is correct, expand to the required line range. ‘:%s/…/…/g’ can replace the same word in different contexts all at once.
The search part is interpreted by regular expression pattern rules. In particular, symbols like ‘.’ can have different meanings than their literal characters, and ‘&’ in the replacement content also has a special meaning. Do not directly apply the simple English word examples in this article to arbitrary paths or complex strings. If you find an incorrect result immediately after replacement, press ‘Esc’ then ‘u’ to undo the previous change and verify. Changes saved with ‘:w’ are not automatically undone even if you later use ‘:q!’.
Minimum Reference Table After Practice
In the table below, movement and editing keys are used in command mode after pressing ‘Esc’. Colon commands and searches require ‘Enter’ at the end. Case sensitivity applies.
| Purpose | Key or Command | Points to Remember |
| Return to command mode | Esc | End input and start next command |
| Start input | i / a / o | Before character / After character / New line below current line |
| Save and exit | :w / :q / :wq | Save / Exit / Save and exit |
| Discard changes and exit | :q! | Discard changes since last save |
| Move one character | h / j / k / l | Left / Down / Up / Right |
| Move line/word | 0 / $ / w / b | First character of line / Last character of line / To start of next/previous word |
| File end/beginning | G / 1G | Last line / First line |
| Delete/copy/paste line | dd / yy / p | Line-unit content is pasted below current line |
| Undo previous change | u | This article assumes only one undo |
| Find / Next result | /word / n / N | Search / Same direction / Opposite direction |
Vim’s gg, Visual selection mode, Ctrl-r, :syntax, and vimtutor are not included in the common vi practice in this article. You can learn them separately after confirming that the actual executable is Vim.
After completing the practice, exit vi with ‘:wq’ or ‘:q!’. If you no longer need the files, clean up only the files and empty directories created in this session in the same shell as follows. ‘rmdir’ refuses to delete a directory if it contains other files.
rm "$vi_lab_dir/practice.txt"
rmdir "$vi_lab_dir"
Scope of Execution Verification and Sources
On October 9, 2026, verification was performed on macOS arm64 using /usr/bin/vi and Vim 9.1 (patches 1-1752) in compatibility mode, opening temporary text files without using user settings, history, or swap files. Input, save/exit, refusal of :q in unsaved state and file preservation after :q!, movement, line copy/delete/paste, single undo, search direction, and replacement scope and results were confirmed.
These results are from practices performed in Vim. Other vi implementations, reader’s server settings, key mappings, Korean input methods, and terminal clipboard operations were not verified. Direct access to the POSIX official page was blocked, so cross-verification was done using searchable specification sections, and the entire specification document was not downloaded and reviewed. Detailed explanations used both the Vim official help and actual command results below.
- POSIX vi Specification: Standard basis for command and input states, basic editing commands
- POSIX ex Specification: Basis for colon commands like save, exit, replace
- Vim Getting Started, Movement and Search, Line Copy and Paste: Basic practice explanations
- Vim Replace and Line Range, Undo: Differences in scope, patterns, and implementation
Leave a Reply