“You can’t use Microsoft ZoomIt on a Mac” became an incorrect statement starting August 2026. This is because Microsoft itself released Sysinternals ZoomIt for Mac. It’s not a third-party app with a similar name or a Windows virtual machine, but an official macOS app distributed by the Microsoft GitHub organization.
ZoomIt is a presentation tool that instantly magnifies small parts of the screen, draws lines, arrows, and text on it, and captures or records the screen. It’s especially useful for showing a single line of code enlarged in a lecture hall or circling a specific button during a video conference. It’s less like a magnifying glass app and more like an app that combines a presenter’s laser pointer, whiteboard, and capture tool into one.
In this article, we’ll sequentially examine what’s different from existing alternatives like ZoomacIt, how to install it on a MacBook, the permissions you need to grant initially, the difference between Static Zoom and Live Zoom, basic hotkeys, recording, OCR, and panorama features, and limitations to be aware of before actual use.

Mac presentation environment where small code and interfaces are magnified and annotated to explain to the audience
1. What was ZoomIt originally?
ZoomIt is a Windows utility created by Mark Russinovich of Microsoft Sysinternals for technical presentations and demos. For a long time, its core was a simple flow: instantly magnify the area under the mouse during a presentation, draw on the magnified screen, and display a break timer.
Until now, Mac users had to rely on macOS accessibility zoom features or separate open-source projects like ZoomacIt. While these tools were meaningful, they weren’t ZoomIt itself, distributed by Microsoft. However, the ZoomIt page on Microsoft Learn was updated on August 19, 2026, officially adding a Download ZoomIt For Mac link. Microsoft Learn ZoomIt Page
The official repository for the Mac version is also github.com/microsoft/ZoomitForMac. The repository is open-sourced under the MIT license and guides users to install the signed and notarized app via Microsoft’s Homebrew tap. Therefore, it’s safer to start from Microsoft Learn, Microsoft GitHub, or Microsoft Homebrew tap rather than arbitrarily searching for similarly named DMGs on the internet. Microsoft ZoomIt for Mac Official Repository
2. How is it different from existing macOS zoom features?
macOS already has System Settings → Accessibility → Zoom. This feature is an accessibility function for users who need to continuously view the screen enlarged. In contrast, ZoomIt is tailored for a flow where you briefly magnify, annotate, and then immediately return to the original screen during a presentation.
It also differs from browser or editor zoom features. Browser zoom only enlarges the content within the webpage, and IDE font zoom only enlarges code. ZoomIt operates on the currently visible screen beyond app boundaries, making it advantageous when explaining across menus, terminals, diagrams, and settings windows.
| Tool | Main Purpose | Zoom Scope | On-screen Drawing | Switching during Presentation |
|---|---|---|---|---|
| macOS Accessibility Zoom | Continuous screen magnification | Entire system | Not built-in | Optimized for accessibility use |
| App-specific Zoom | Document/web/code readability | Within the app | Varies by app | Requires per-app manipulation |
| ZoomIt for Mac | Lectures/demos/screen sharing | Current screen and selected area | Lines/shapes/arrows/text | Instant switching with global hotkeys |
It’s more accurate to understand that ZoomIt doesn’t replace accessibility zoom but serves a different purpose. If you need continuous magnification to reduce eye strain, macOS’s built-in feature is more natural; if you only need magnification and annotation at the moment of explanation, ZoomIt is faster.
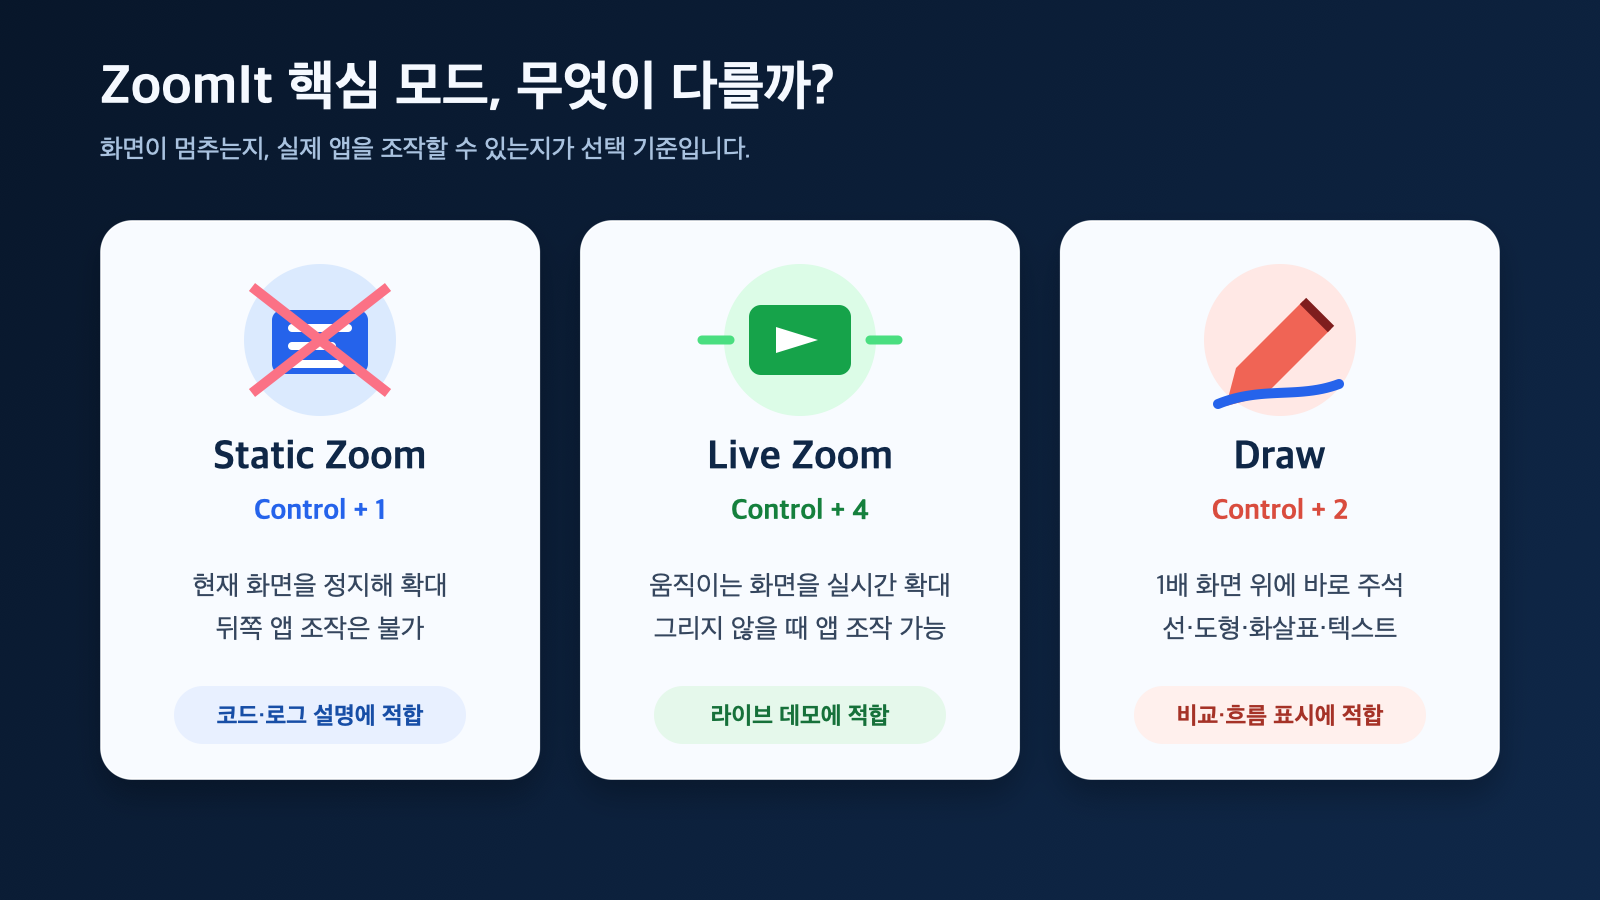
Figure: Three core presentation modes of ZoomIt for Mac · Reconstructed based on Microsoft Official Repository
3. Installation: A single Homebrew command is all it takes
The official distribution channel is Microsoft’s Sysinternals Homebrew tap. Open Terminal on a Mac with Homebrew installed and run the following commands:
brew tap microsoft/sysinternalstap then brew install --cask microsoft/sysinternalstap/zoomit
If you’ve already registered the Microsoft Sysinternals tap, you can use a shorter command:
brew install --cask zoomit
You can check the installation status as follows:
brew list --cask | grep zoomit
The official repository states the requirements are macOS 14 Sonoma or later and Xcode Command Line Tools. ZoomIt runs from the menu bar rather than appearing as a regular app residing in the Dock. According to the Homebrew tap description, the distributed app is signed with a Developer ID and undergoes Apple notarization and stapling. Arbitrary isolation bypass commands to circumvent Gatekeeper are not the standard procedure for the official path. Microsoft Homebrew Sysinternals tap
To uninstall, use the following command:
brew uninstall --cask microsoft/sysinternalstap/zoomit
4. Why does it request permissions on first launch?
For ZoomIt to magnify the screen, it needs to capture the current screen. Therefore, when you first use a capture feature, macOS will request screen recording permission. You may need to allow ZoomIt in System Settings → Privacy & Security → Screen Recording and then restart the app.
Here, screen recording permission does not mean “automatically save presentations to video files.” macOS controls the act of an app reading screen pixels itself with this permission. Even Static Zoom capturing the current screen as a still image falls under screen capture.
Microphone and camera permissions are optional. They are only needed if you want to record with system audio or your voice, or composite a webcam feed as Picture-in-Picture. If you’re only using it for simple magnification and drawing, there’s no reason to grant unnecessary permissions in advance.
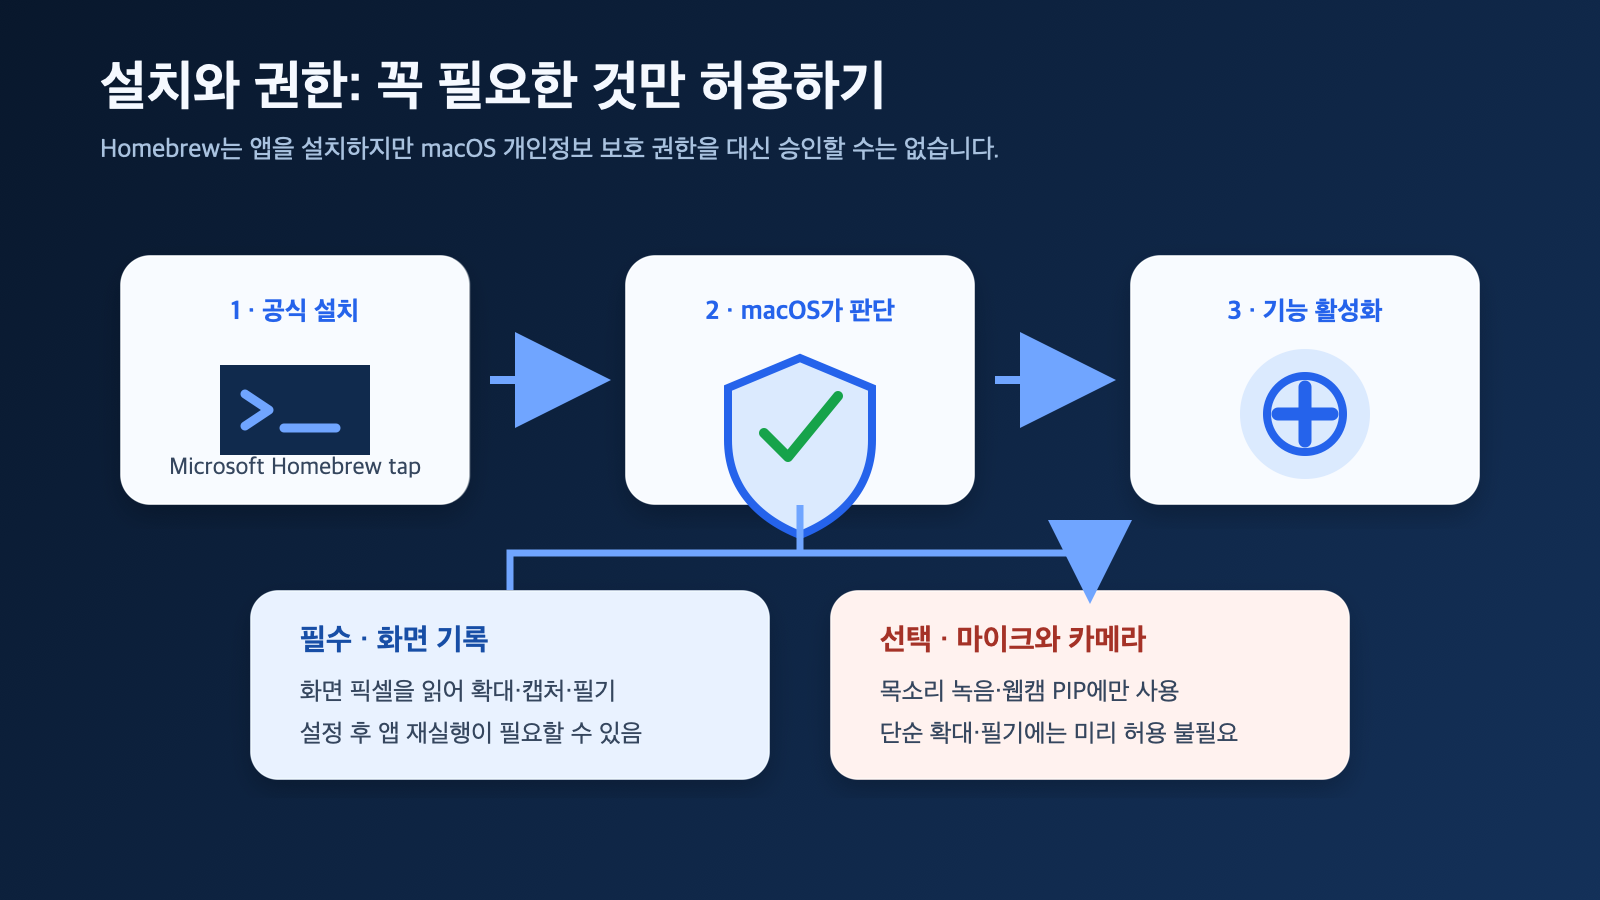
Figure: ZoomIt for Mac installation and macOS permission flow · Reconstructed based on Microsoft Homebrew tap description
5. Differences between Static Zoom, Live Zoom, and Draw
To use the Mac version comfortably, just remember the differences between these three modes first.
Static Zoom: Magnifies a frozen screen
Pressing Control+1 captures the current screen and magnifies it in a frozen state. This is good for holding and examining scenes where the screen changes continuously, such as code or logs, which are difficult to explain otherwise. You can draw by clicking while in the magnified state.
Since it’s a still image, it’s not for clicking apps in the background or actually manipulating buttons. It’s suitable for showing the audience “this part of the error message that just appeared.”
Live Zoom: Magnifies a moving screen
Control+4 magnifies the running screen in real-time. When not in drawing mode, you can click on the original app while viewing the magnified screen. This is useful when you need to combine magnification with actual manipulation, such as live coding or web service demonstrations.
The official repository explains that Live Zoom itself may be excluded from recording to avoid infinite feedback of its own screen. If magnification effects must be included in the recording result, it’s better to first test Static Zoom with annotation overlay.
Draw without zoom: Annotate directly on a 1x screen
Control+2 enters drawing mode at the current screen size without magnification. This is fast for adding arrows to the flow of an architecture diagram or comparing two items in a settings window.
6. Essential Hotkeys to Memorize
All global hotkeys can be changed in Settings. If they conflict with other apps, it’s safer to adjust them before a presentation rather than stubbornly sticking to the defaults.
| Hotkey | Action |
|---|---|
Control+1 |
Static Zoom |
Control+2 |
Draw without zoom |
Control+3 |
Break Timer |
Control+4 |
Live Zoom |
Control+5 |
Record Screen |
Control+6 |
Capture Region |
Control+7 |
OCR Region |
Control+8 |
Panorama Capture |
While zoomed, adjust the magnification with Option+Up/Down Arrow, and exit with Esc or right-click. While drawing, Shift creates a straight line, Control a rectangle, Control+Shift an arrow, and Tab an ellipse. T is for text input, Command+Z for undo, and E for erasing all annotations. [ZoomIt for Mac Default Hotkeys]
7. Many more features than a simple magnifying glass
The Mac version is not a minimal port of just zoom and drawing. Based on the official repository, it includes the following features:
- Full screen or selected area MP4 recording
- System audio and microphone audio selection
- Webcam Picture-in-Picture composition
- Trim, concatenate other videos, fade, mute, and export after recording
- Region capture and PNG saving
- On-device OCR using Apple Vision
- Panorama capture that stitches vertical/horizontal scroll areas into a single image
- Break countdown timer
- Auto-start on login and hotkey settings
OCR is performed by pressing Control+Option+6 and dragging a region to recognize text on the screen and copy it to the clipboard. According to the official description, it uses Apple’s on-device Vision text recognition, so it does not send images to a separate cloud OCR service.
Panorama capture allows you to specify an area of a long webpage or settings list, then scroll to stitch frames together into a single image. It also includes processing to suppress fixed headers and footers and filter out repeating frames. However, for complex animations, virtual scroll lists, or pages that continuously change shape, you should check the results before saving.
8. How to use it in lectures and screen sharing
The most practical flow is short:
- First, show the context of the explanation on the full screen.
- Magnify small code or logs with
Control+1. - Click to enter Draw mode and draw an arrow on important lines.
- Exit with
Escand continue actual operations. - If you need to magnify the operation itself, use
Control+4Live Zoom.
In video conferences, the presenter’s 4K screen is often scaled down to a small window for participants, making text especially small. Instead of insisting on full-screen sharing, magnifying the relevant part with ZoomIt immediately lets participants know where to look.
If you plan to record, it’s a good idea to create a 30-second test video before the actual presentation to confirm that zoom, annotations, system audio, microphone, and webcam are included as desired. For presentation tools, reliable hotkeys and permission status are more important than the number of features.
9. Limitations and Security Points to Know Before Installation
First, the official requirement is macOS 14 or later. Do not assume that Microsoft’s official ZoomIt is supported on older Intel Macs or older macOS versions just because other similarly named apps run there.
Second, screen recording permission is a powerful permission. You should organize your presentation desktop and notification settings to avoid starting capture/recording while password managers, customer information, or internal dashboards are visible. Webcam and microphone should also only be allowed for necessary sessions.
Third, default hotkeys may conflict with macOS Spaces switching or keys in terminals/IDEs. It’s safer to change your key combinations in advance and test them with external monitors and screen sharing environments rather than installing for the first time just before a presentation.
Fourth, while the Windows and Mac versions have similar purposes and main hotkeys, you cannot assume that their internal implementations and some features are identical. The Mac version uses macOS frameworks like ScreenCaptureKit, AVAssetWriter, and Apple Vision. Do not directly apply descriptions of the Windows version included in PowerToys as guarantees for the Mac version’s behavior; verify based on the official Mac repository.
Conclusion: Now, on Mac, it’s the official ZoomIt, not a ‘substitute’
The era of having to find third-party alternatives for screen magnification and annotation when presenting on a MacBook is over. Microsoft has provided an official ZoomIt for Mac repository and Homebrew distribution path, allowing the zoom, drawing, and timer workflow familiar to Windows presenters to be used on macOS.
Installation starts with a single line: brew install --cask microsoft/sysinternalstap/zoomit. Then, grant screen recording permission, and first familiarize yourself with Control+1 Static Zoom, Control+2 Draw, and Control+4 Live Zoom. Recording, OCR, and panorama can be added one step at a time as needed.
The most important point is the official source. Instead of searching for and installing similarly named apps, you should check the Mac download link on Microsoft Learn or use the microsoft/ZoomitForMac repository and Microsoft Sysinternals Homebrew tap. If you need to explain small screens in lectures, demos, code reviews, or remote support, the official ZoomIt is now a viable option on Mac.
Leave a Reply