Hello everyone! Today, I’d like to provide a very detailed overview of the ‘Docker Life Cycle’, which is fundamental when studying Docker but often confuses many.
docker create, docker start, docker run… What exactly is the difference between these seemingly similar commands? 🤔 The answer to this question becomes clear once you understand Docker’s life cycle (flow).
Let’s look at the 4-step process of an image coming into your computer, being executed, and then being saved or deleted, along with illustrations.
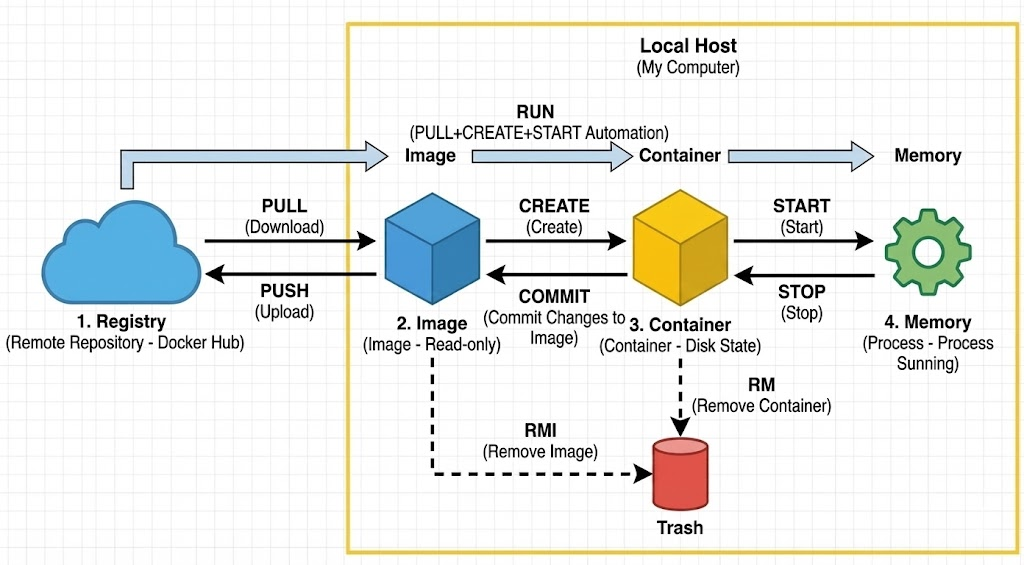
1️⃣ Step 1: Image Procurement (Registry ↔ PC)
“The stage of preparing materials (blueprints)”
The starting point for all containers is an Image. This is the process of bringing an image from an external repository to your computer (Local Host), or conversely, sharing an image you’ve created.
- ☁️ Registry: A vast warehouse for collecting images, like Docker Hub.
- ⬇️ PULL: A command to download an image from the repository (Registry) to your computer. (e.g., docker pull ubuntu)
- ⬆️ PUSH: A command to upload an image you’ve worked on (or modified) on your computer to the repository, sharing it with teammates or people worldwide.
2️⃣ Step 2: Container Creation (Image ↔ Container)
“The stage of building the framework of a building from a blueprint”
A downloaded image is merely a read-only file that cannot be executed on its own. Based on this, you need to create a container, which is the actual workspace.
- 🟦 Image: It’s in a ‘blueprint’ state, not executable. The original remains unchanged no matter how much you interact with it.
- 🏗️ CREATE: Creates a container based on an image.
- ⚠️ Important: At this point, only file system isolation occurs, and the program is not yet running (loaded into memory). It’s like a computer that has been assembled but the power button hasn’t been pressed.
3️⃣ Step 3: Execution and Stopping (Container ↔ Memory)
“The stage of powering on and actually operating”
Now it’s time to make the created container actually run. Processes operate using CPU and memory (RAM).
- 🚀 START: A command to execute a created container, loading it as a process into memory.
- 🏃 RUN (Most frequently used!): Solves tedious processes in one go!
- RUN = PULL (if not present) + CREATE + START
- It’s an all-in-one command that downloads an image if it doesn’t exist, creates it, and then immediately runs it.
- 🧠 Memory (Process): The state where the container is actually alive and breathing (operating).
- 🛑 STOP: Stops a running container. The process is unloaded from memory, but the container itself (including its working data) remains on disk. (Like a computer with only the power turned off)
4️⃣ Step 4: Saving and Deletion (Management)
“The stage of saving results or cleaning up”
Once the work is done, you’ll need to save the changes to create a new blueprint or discard unnecessary items, right?
- 💾 COMMIT (Very Important): If you’ve modified files or changed settings inside a container, this command saves those changes as a new image.
- If a container is deleted, its data is lost, but if you commit it as an image, you can run it again in that exact state anytime.
- 🗑️ RM (Remove): Deletes a stopped container. (Completely removed from disk)
- 🔥 RMI (Remove Image): Deletes the image file itself stored locally.
✨ Summary: Flow of Docker Commands
Just remember this flow, and you can become a Docker master!
- PULL: Get the blueprint (Image).
- CREATE: Create the product (Container). (Not yet running)
- START: Turn on the product. (Running)
- (Tip: RUN does 1, 2, and 3 all at once!)
- COMMIT: Save the changed content back as a blueprint (Image).
- RM / RMI: Discard unnecessary products (Containers) or blueprints (Images).
If you keep this life cycle diagram in mind, when an error occurs, you’ll be able to make an accurate diagnosis, such as “Ah, I have the image, but the container hasn’t been created” or “Only the process died, but the container is still alive.”
I hope today’s content was helpful for your Docker learning! If you have any questions, please leave them in the comments. 👋
Leave a Reply