Recently, with the fragmentation of architectures between cloud servers (Intel/AMD) and personal development PCs (Apple Silicon ARM, etc.), the need for multi-architecture container images that are not dependent on a single environment has grown. This article details how to build images that run on both Intel (linux/amd64) and ARM (linux/arm64) architectures using only Podman in a Mac environment.
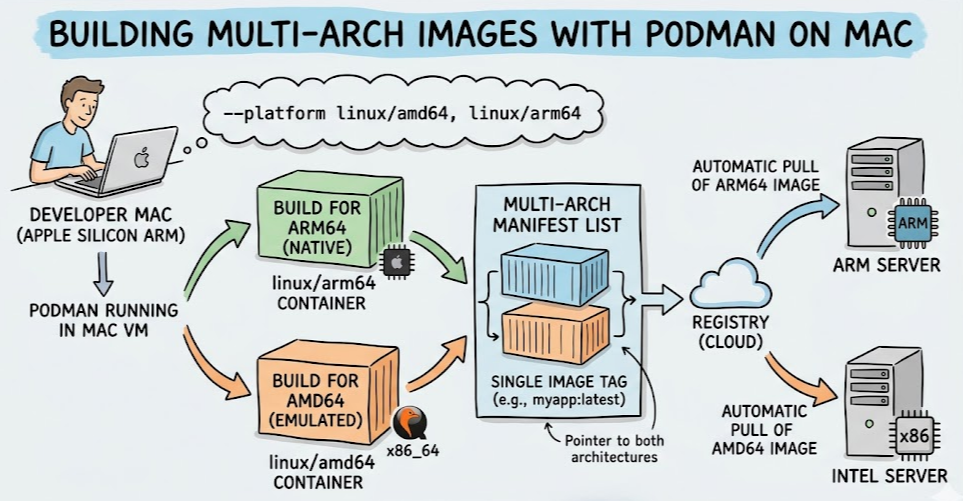
1. Concepts of Multi-Architecture Images and Manifests 🧠
Generally, container images follow the architecture of the host performing the build. Therefore, an image simply built on an Apple Silicon Mac cannot be run on an Intel server.
Multi-architecture images use the concept of a ‘Manifest List’. This acts as an index, grouping images for multiple architectures under a single image tag (e.g., myapp:latest). When a user pulls an image, the container engine checks the current system’s architecture and automatically selects the appropriate image from the manifest.
2. Preparation: Podman Machine Setup on Mac ⚙️
In a Mac environment, Podman does not run natively because there is no Linux kernel; it runs on a virtual machine (VM). Podman installed on a Mac manages VMs through the podman machine command.
For Apple Silicon (M1, M2, M3, etc.) Macs, x86_64 (Intel) emulation via QEMU or Apple’s Rosetta 2 is supported by default within this VM. Therefore, there is no need to install complex emulator packages like in a Linux environment; simply running the VM is sufficient.
# Initialize Podman virtual machine (first time only)
podman machine init

# Run Podman virtual machine
podman machine start

# Check VM status and emulation support
podman info
3. Writing a Containerfile for Practice 📄
For testing, we will prepare a very simple image that outputs architecture information. The file name can be either Containerfile or Dockerfile.
# Containerfile
FROM alpine:latest

# Command to output the architecture of the built environment
CMD ["uname", "-m"]
4. Method 1: Multi-Architecture Build with a Single Command (Recommended) 🚀
Podman provides the ability to build multiple architecture images and bundle them into a manifest with a single command by combining the –platform and –manifest flags.
# Build linux/amd64 and linux/arm64 platforms simultaneously and create my-multi-app:latest manifest
podman build --platform linux/amd64,linux/arm64 --manifest my-multi-app:latest .
The process of this command execution is as follows:
- Performs an isolated container build for the amd64 architecture environment. (Utilizing Mac’s emulation)
- Performs an isolated container build for the arm64 architecture environment. (Apple Silicon native)
- Saves the two independent images to the local repository.
- Creates a manifest list named my-multi-app:latest and links the two previously built images together.
5. Method 2: Individual Builds and then Merging into a Manifest 🧩
If the build process differs by architecture, or if existing built images need to be bundled, you can manually control the manifest.
# 1. Create an empty manifest
podman manifest create my-manual-app:latest

# 2. Build images individually by architecture
podman build --platform linux/amd64 -t my-manual-app:amd64 .
podman build --platform linux/arm64 -t my-manual-app:arm64 .

# 3. Add individual images to the created manifest
podman manifest add my-manual-app:latest localhost/my-manual-app:amd64
podman manifest add my-manual-app:latest localhost/my-manual-app:arm64
6. Verify Results and Push to Registry ☁️
Inspect the created manifest to ensure it correctly includes multiple architectures.
# Inspect manifest information
podman manifest inspect my-multi-app:latest
Check that both amd64 and arm64 are present in the ‘manifests’ array of the output JSON information. Once confirmed, push to an external container registry (Docker Hub, AWS ECR, etc.).
# Push the manifest itself to the registry
# (All image layers for all architectures linked to the manifest are uploaded at once)
podman manifest push my-multi-app:latest docker://docker.io/myusername/my-multi-app:latest
After the manifest push is complete, when you run podman run –rm myusername/my-multi-app:latest on any device, whether an Intel server or an ARM PC, the container appropriate for that device’s architecture will start correctly.
Leave a Reply